Friday, June 7, 2024

America...Sew Beautiful.."Sweet Land of Liberty" Phase 2

 Hey quilter's...it's finally Friday! I don't know about y'all but this week flew by for me. I alway's tell "youngster's" when talking with them..."don't get old..it's a trap." Funny Story...it is! Yesterday I seriously thought it was Wednesday then my hubby this morning thought today was Thursday. Seriously! Mind blowing but ya just need to laugh. Well today I'll be sharing Phaase 2 of the design where you'll be making the corner star blocks. Please do not let those stars intimidate you. Some clever quilter (not me) came up with a genious was to make them. I've enjoyed making stars more once I learned this clever technique. The center of the starts will be pieced due to using 2 1/2 in strips but you could do a solid square from scraps if desired. I've really enjoyed coordinating the fabrics within the collection together. I love it when they do all the hard work for me. I hope your enjoying using a "Jelly Roll & Panel" especially if it's your first time too. I'm really having a blast this year challenging myself...learning new techniques & thankful y'all are learning a long with me. Remember there's no quilting police on my blog so just take your time matching points/seams when piecing the stars. I try not to pin...just "scooch" the seams together when sewing the seams. Most quilter's call it "nesting the seams" but for me it seems that I do a lot of "scooching." :-) I made 2 each of the same design then I'll be placing in opposite corners within the borders. The prints are so stunning so you can't go wrong :-) By now you've got an idea of how you want to lay out your stips for the borders so keep that in mind when choosing the fabrics for the stars if desired. Don't be as O,C,D. (only Cat does) as I was,,,just enjoy creating your design and most of all....have fun! If you still need supplies my link to Missouri Star Quilt Company will save 20% off $50. or more for the month of June. I thank y'all so much for following and talk soon.

Blessed Quilting from My Home to Yours,

Cat

MSQC Affiliate

Paid Partnership w/MSQC

Follow me on Instagram...Facebook & Pinterest (links on right of home page)


Here's all you do...

( Directions for Four... 8 1/2 x 8 1/2 blocks...finished 8")

* For center....rotary cut 4 squares in desired fabric 2 1/2 x 2 1/2 ...

* Per design...sew 2 squares w/right sides together using a 1/4" seam allowance for row 1. Press.

* Repeat for row 2 then join the rows together to form a 4 patch block. Press.

* Repeat for all 4 Corner Blocks.

Tip...if you press your seams in opposite directions before joining the rows together they will "scooch/nestle" together better :-)

Red Points of Star...

* From desired background fabric...rotary cut 4 strips 2 1/2 x 4 1/2 

* From desired accent fabric (red) rotary cut 8 squares 2 1/2 x 2 1/2/

* From desired accent fabric for corner squares...rotary cut Four squares 2 1/2 x 2 1/2.

*Per design...place one square along top edge of white 2 1/2 x 4 1/2 strip and draw a line from corner to corner...sew directly on that line & press open. Trim away access fabric on back.


* Repeat for opposite corner. Press.


Tip...follow direction of points on block design when drawing line corner to corner. This helps me so I don't get my directional lines confused :-)


* Repeat for all for sides of block.

* Place on each side of center square per design. 


* Place corner blocks per design.


* Sew Row 1 sqaures  w/right sides together using a 1/4" seam allowance. Press.

* Repeat for Row 2...matching center seams.

* Then Row 3...press

* Per design...Join rows togher using the same method...Press.

* Repeat for all four corner blocks.

You did it! They are sew much fun to make :-)

Check back soon for Phase 3,

Cat


Thursday, June 6, 2024

America...Sew Beautiful. "Sweet Land of Liberty" Phase 1

 Hey quilter's...hope all is going well. I don't know about y'all but it's already hot here in Florida. Oh my gosh...it's gonna be a long hot summer. But with the bad you need to think of the positive....staying inside and sharing summer projects. I am thrilled on this 2nd Part of "America...Sew Beautiful." The panel by Moda Fabrics is stunning. The "jelly roll" designed by Lella boutique for Moda is great. The collection of the fabrics are beautiful and you get a part of the whole collection in the strips. This is the first time "ever" that I've used a "jelly roll." I always thought it would be difficult to design with due to the 2.5" strips. Y'all I've discovered how wrong I've been all these years. The strips worked perfectly to incorporate into my "Stars" and it gives the borders more of a scrappy look that I love. I wanted to challenge myself this year as I've previously stated and will admit a "Jelly Roll" made me think out of my "Quilting Box." Sometimes I get stuck in my "creative box" & get intimidated by certain blocks but I've recently discovered even in my 'late years" it's good to challenge myself. Well y'all part of challenging myself is sharing fun-ctional Scrap-a-longs w/you. This 2nd Part of the Series is featuring a "lap quilt" w/the stunning panel. I'll be sharing easy techniques that would be great for a beginner quilter and inspire kiddos to learn to sew/quilt this summer. This is also the first time that I am using a "Panel" and I'm loving how easy this quilt is coming together. So don't be a bit suprised if you see some more panel designs coming. It is the new crave in the quilting world. People are sewing/quilting more with panels. Plus it makes a fast easy gift too. I've designed the quiltin EQ8 for accuracy but always make sure my directions are working with yours. My size will be approximately 51 x 59 but you could easily enlarge if desired. You would need to "join" strips together to make a longer border if you do so please keep that in mind. Oh, if you still need supplies my link to Missouri Star Quilt Co. w/save you 20% off $50. or more for the month of June. I love it when they extend a great discount plus their website always features "daily deals." Well lets get started on making this super cute quilt! 

Blessed Quilting from My Home to Yours,

Cat

MSQC Affiliate

Paid Partnership w/MSQC

Follow me on Instagram...Facebook & Pinterest (links on right of home page)


* Supplies are listed in previous post :-)

Here's all you do...

* Press your panel.

* Square up your "dark blue border" to 3/4" ,,,this includes a 1/4" seam allowance for a half-inch finished border.

* Set aside.

Tip...Clip/hang as desired so you don't need to press again. 

* Lay out your "Jelly Roll" strips to see all the stunning cuts of the fabric collection. 

* Press if needed.

Tip...I like to "coordinate my strips" to get a visual of how I'd like to combine the fabrics 2gether.

In the next Phase I will be showing how I coordinated the fabrics strips within the design but let your creativity flow. Refer to the design for inspiration. This is a fast & easy project so remember to enjoy and have fun. There's no quilting police in my "sewing room." It's all about "less-stress-quilting." :-) 

Talk soon,

Cat


Monday, June 3, 2024

America...Sew Beautiful "Sweet Land of Liberty" Quilt!

 Hey quilter's...hope y'all had a great weekend. I was able to do some designing in my favorite quilt software (EQ8) for this next project. I'll be featuring this stunning Panel by Moda Fabrics along w/ Jelly Roll "Old Glory". We'll be making a "throw size quilt" together but you can easily enlarge if desired. This is also a fun & easy project to teach the kiddos to sew and quilt this summer. I'll be quilting with Aurifil thread with basic straight line stitching along w/ accent quilting within the design. Sometimes the little things do enhance the design. I quilt on a domestic machine my "Jazz II..Babylock" but can you imagine how stunning this quilt would look being quilted by a 'long armer." Funny story...years ago I told my sweet grandson that I would love a "long arm" from Santa. He looked at me real strange and said "Gege I think your arms are long enough." I see his face and hear his words everytime I hear the words quilted on a "longarm." Memories I'll cherish forever. :-) Anyway....as promised this is the 2nd Part of the 3 Part Series "America...Sew Beautiful" to Celebrate and Honor our Country. I've been having a blast with this panel. It's stunng plus the quality is amazing. The design made it very easy to "square up" the center to add decorative borders using the 2.5 inch Jelly Rolls strips. It's a sweet design to give as a gift or keep for yourself. So come join me on this fun tribute & all supplies are from Missouri Star Quilt Company. They extended the discount so you can save 20% off $50. or more for the month of June on supplies. My link upper right goes stragiht to their website along with discount. I excited to share upcoming projects with you this summer. So no worries about entertaining the kiddos this summer...I got you covered! :-) As always I thank y'all so much for following! Talk soon.

Blessed Quilting from My Home to Yours,

Cat

MSQC Affiliate

Paid Partnership w/MSQC

Follow me on Instagram...Facebook & Pinterest (links on right side of home page)


Here's all you need...

* Sweet Land of Liberty Panel by Moda Fabrics

* "Old Glory" Jelly Roll by Moda Fabrics (designed by LellaBoutique)

* 1 yard of Missouri Star Tossed Star Medium Gray 110" Wide Backing

* Low loft quilt batting

* Aurifil 50# thread (2260, 2710, 2780) 

* Rotary cutter is highly reccommended for this project due to precise squaring up the panel. Well for me anyway :-)

Looking forward to a fun Summer 2gether!

Talk soon,

Cat


Thursday, May 30, 2024

"Boo-tiful Scrap-a-long!"

 Hey quilter's...hope you're having a great week. My day starting off with a anxiety walk then my sweet neighbor showed me all of her quilts she's been working on. It's funny how fabric...sewing...seeing quilts calms me and bring me joy. She gave her quilts the old school "tying" which I love. Tying quilts has been around forever! It's a great way to finish quilts es[ecially if you're short on time. I also feel it would be a fun summer project for kiddos too. I remember many of times "tying quilts" with Oma at the hospital when someone is in surgery. It's a "pack up & go" with the need of no sewing machine. Just a few hands :-) Super sweet memories that I'll cherish forever. Well today I wanted to share w/y'all my progress of this "fun-ctional table runner" that I'm making. I'm using "Hey Boo" Layer Cake by Moda Fabrics...designed by Lella Boutique. The pattern "Hello Pumpkin" is from Missouri Star Quilt Company. I'm following the instructions within the pattern but just making a runner. The instructions are super easy that I might have to add the full quilt to my "bucket list." I love a pattern that inspires me to create something different but still using their awesome designs. I've pieced my squares using Aurifil 50# thread & currently working on  a "scrappy-border." This fabric is sew cute that I can't waste any of it :-) I don't know about you but it's never too soon for Halloween sewing. Especially if you're like me....I'm a bit slow these days so I love to be piecing a design and having one that I'm quilting on too. I pop between them depending on my pain level. Geez :-) Speaking of designs...we have a lot of fun projects happening in June & I'll be giving you a "sneak peek" real soon. I wanted to challenge myself this year...learn new blocks...techniques and will admit it's been a blast! I guess you can teach an old quilter new techniques ;-) If y'all need supplies my link to Missouri Star Quilt Company will save you 20% off $50. or more for the month of May. Thanks so much for following and talk soon!

Blessed Quilting from My Home to Yours,

Cat

MSQC Affiliate

Paid Partnership w/MSQC 

Follow me on Instagram...Facebook & Pinterest (links upper right on home page)

Hey Boo Layer Cake by Moda Fabrics & Hello Pumpkin Pattern by MSQC...progress :-)


Wednesday, May 29, 2024

Easiest, Quickest Fat Quarter Quilt! 😮 Just 12 Fat Quarters in Slice & D...

Hey quilter's...I had to share this super quick quilt design w/ y'all. I'm drinking coffee...googling Missouri Star Quilt Co tutorials for inspiration & this popped up. Hmm...gotta love the internet :-) This technique would make a fast...gift for any occassion. My "design brain" was thinking what a cute baby gift, graduation/wedding gift when you're in a time crunch. I hope y'all enjoy this technique inspires your creativity. Also what a fast way to use up some large scraps too. :-) Thanks for letting me share w/you! 
 
Blessed Quilting from My Home to Yours,

Cat
MSCQ Affiliate
Paid Partnership w/MSQC
Link upper right on home page to save 20% off $50. or more for the month of May!
Follow me on Instagram...Facebook & Pinterest


Tuesday, May 28, 2024

Tuesday confession..."I love ironing & this ironing board cover by Missouri Star Quilt Company!"

 Hey quilter's...hope all is well and you had a restful Memorial day weekend. My heart and prayers are with everyone who's lives was devastated by the Tornados. It was near my family but all safe but seeing the news is heart-breaking. Life is precious. We all know it but when weather hits near by it really is a reality. Memorial Day was one of my dear late dads favorite Holiday. Being a Military man he really honored the Holiday. I reminisced a lot Monday. In fact one of my favorite pics of him is on my "facebook page" of him on Memorial Day. I'm sure he was celebrating up in heaven! I spent the day also "organizing my sewing area"...yes I call it area due to "temporary downsizing." I gave up my sewing/quilting room when we moved to Florida 3 yrs. ago to help my late mom-in-law. I'm hoping real soon that I find a home back in Texas. It's been a long journey and can't wait to have my sewing room again. But will say on the "downsizing" note that it taught me to be more organized and clever :-) I had to overcome some of my O.C.D issues "only Cat does" but I'm trying! As a designer I should be perfectly fine coming up with creative ways to save space...right? Hmm...will admit y'all it's been challenging. I will be sharing some organizing tips with y'all in hopes to inspire others that might be in the same situation. On the O.C.D. note...I love to iron. I feel it's very therauputic & realaxing. Maybe it's the cup of coffee too! I love the Missouri Star Quilt Company's ironing board cover. The quality is amazing & it's super cute! Yes...that is important :-) The cover is made of 100% cotton & the one piece preofessional fiber felt pad is 5mm thick...easy fit elastic & it's 54L x 15"w. I used to keep my ironing board "up" in my quilting room but now I do need to tuck away when not in use. But will say...it might get learned near my antique craft hutch sometimes. The color hue is perfect to inspire your creativity. I't sure makes ironing a joy! I was so thrilled with my "new addition" that I ironed my Quilt Backs from Missouri Star Quilt compamy. The Tossed Missouri Star wide backs is 110". So having a great ironing board is essential and will say y'all that quality of this cover is perfect! Chuck love it too. Did you see him in the pic? MSQC now has a "Chuck template." Oh my gosh y'all...he really is super cute :-) I'' be sharing pics of upcoming projects in hope to inspire y'all to "Scrap-a-long" w/me. My link to MSQC will save you 20% off $50. or more for the month of May on supplies. Oh....I'll also be sharing the 2nd part of "America...Sew Beautiful" reall soon :-) I thank y'all so much for following and talk soon!

Blessed Quilting from My Home to Yours,

Cat

MSQC Affiliate

Paid Partnership w/MSQC 

Follow me on Instagram...Facebook & Pinterest (links upper right on home page)

Missouri Star Quilt Company ironing board cover...


Friday, May 24, 2024

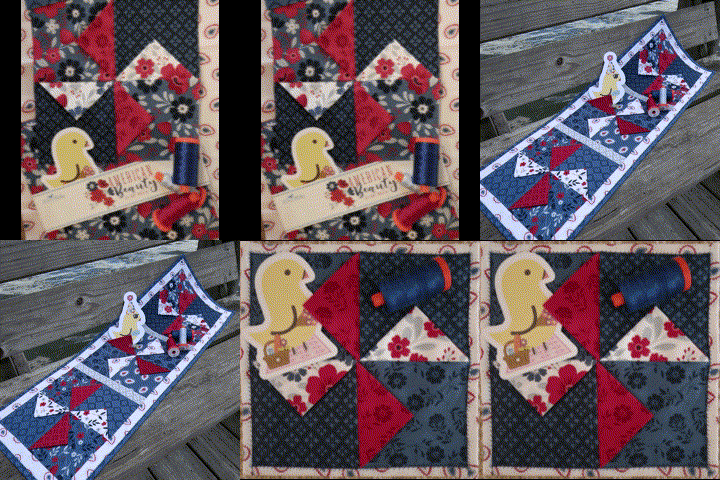
America...Sew Beautiful "Party-Point Trivet" 4 Entertaining!

 Hey quilter's...well it's finally Friday! I wish for y'all to have a restful long Holiday weekend. I know I'll be doing my usual but that's o.k. too. I'm excited to share w/ y'all the trivet to go along with the "Party-Point-Celebration" Runner. Yes, I always make a trivet but it does have a positive note. I love to have a coordinating trivet for entertaining but this also lets me practice my quilting for the runner too. I love to see what style/stitches that I can do within the design on a small scale. I've been sharing basic quilting techniques geared toward the new beginner levels of quilting but you can always do advanced techniques. I've even stepped way out of my comfort zone and created a "reel" this morning. I'm hoping I can upload to share here on blog. I seriously need my 14 yr. old grandson :-) The trivet is used with "Insul-bright" for hot/cold items that I add in after I've quilted my block. Less bulk then I top stitch at end to secure all layers. This is the first collection of the 3-part Series "America...Sew Beautiful," Celebrating & Honoring our Country. I'll be sharing the next project real soon. If you need supplies my link to Missouri Star Quilt Company will save you 20% off $50. or more for the month of May. I hope y'all have a Blessed weekend...doing what you enjoy! Thank y'all so much for following and have a great Memorial weekend!

Blessed Quilting from My Home to Yours,

Cat 

MSQC Affiliate

Paid Partnership w/MSQC

Follow on Instagram...Facebook & Pinterest (links upper right on home page)


Here's all you do...

* Use scraps from runner... Rotary cut 2... 5 x 10" squares (2 different blue prints)

* Subcut into  2...5 x5 squares each. Will make 4 squares.

* Alternate squares to make a 4 patch design.

* Rotary cut white and red scrap fabrics the same way to make your "party-points"

* Alternate your "party-points" per deign within the squares.

* Top stitch along the raw edge (1/8" seam allowance) of party-points to secure to square following design.

* Sew squares 2gether using the 4 patch directions as previously stated on Table runner.

Border/Binding...

* Rotary cut from white paisley fabric two  strips 2 x 91/2 and sew with right sides together using a 1/4" seam allowance to top/bottom of block. Press

* Rotary cut 2 strips 2 x 12 1/4 and sew as above to the left/right side of block. Press.

* Rotary cut batting to 9 1/2 x 9 1/2 and place behind block and quilt as desired. This gives you a chance to practice your quilting on a small scale. 

* Rotary cut backing/insulbright to 9 1/2 x 9 1/2.

Layer backing...right side down...insul-bright then block facing right side up.

* Starting at top...fold over border to back of block leaving a 1/4" binding on front. Fold in half agin on back of block to fold in raw edge.

* Repeat same step for bottom...then left/right sides.

* Top stitch on front of block to secure fold on back.

* Finishes 9 1/2 x 9 1/2

Note...I like to do a crazy stitch to catch the fold on back plus it gives a fun decorative stitch on front :-)


Hope you enjoy'd this collection.

Talk soon,
Cat